Physical Address
304 North Cardinal St.
Dorchester Center, MA 02124
WordPress is written using PHP as its scripting language and MySQL as its database management system. If you’re just using WordPress, you don’t need to know any of this.
However, a basic understanding of both can help you deal with some issues and understand how WordPress works.
In this article, we will explain how WordPress uses the database, including an introduction to the default data tables in the WordPress database.
We will also show you how to use phpMyAdmin to manage WordPress databases, including database backups, optimizations, and more.
This is a comprehensive article on WordPress database management, so we’ve added navigation to the article for easier reading.
A database is a system that stores and retrieves data in an organized manner. Databases allow the software to programmatically manage data.
For example, WordPress uses PHP (programming language) to read data from the database.
The information stored in the WordPress database includes posts, pages, comments, categories, tags, custom fields, users, and some other settings. We will explain in detail later when we explain the WordPress data table.
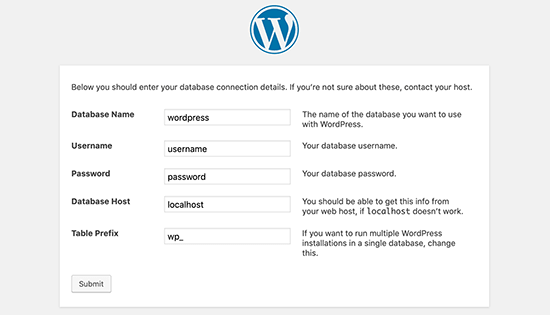
When you first installed WordPress, the program asked you to fill in the database name, host, username, and password. This information is stored in a configuration file called wp-config.php.

During the installation process, WordPress uses the database information you provide to create data tables and stores the default installation data in these tables.
Once installed, WordPress queries this database to dynamically generate HTML pages for your website or blog.
This is why WordPress is so powerful because you don’t need to manually create HTML pages one by one, WordPress will dynamically handle everything for you.
Where is the WordPress database stored?
WordPress uses MySQL as its database management system, which is a set of software installed on your WordPress hosting server. Your database is also stored on the same server.
In most shared hosting environments, however, this location is inaccessible. However, if you are using VPS hosting or a dedicated server, then you can use command line tools to find the database.
In most cases, the location of the database is as follows:
/var/lib/mysql/your_database_name
However, the location of each host’s data storage may be different.
One thing to keep in mind is that you don’t need to actually access the database file itself. You can use other tools to manage the database, such as phpMyAdmin.
PhpMyAdmin is a web-based software that allows you to manage MySQL databases using a browser. It provides an easy-to-use user interface that allows you to run MySQL commands and operate on the database.
You can also use it to browse and edit database tables, rows, and fields, and import, export, or delete all data in the database.
All top WordPress hosting companies come pre-installed with phpMyAdmin, which you can find in the Databases module of your hosting account’s cPanel admin panel. Below is a screenshot of the Bluehost control panel.
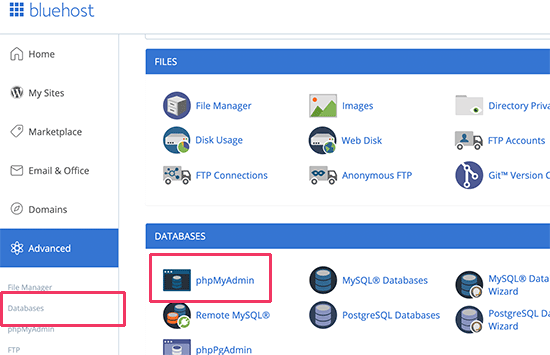
Depending on the hosting service provider, your cPanel panel may not look the same as in the picture above, but you should also be able to find the phpMyAdmin icon in the database module.
Click the icon to open the phpMyAdmin interface. On the left sidebar of the interface, you can select your WordPress database, and then phpMyAdmin will display all the data tables in the database.

Let’s take a look at the tables in the WordPress database.
When WordPress is installed, there will be 12 default data tables, and the data in each table contains different functions of WordPress.
Looking at the structure of these tables, you can easily understand where the different parts of the website live. Currently, a default WordPress installation creates a data table like the one below.
Note: The wp_ in front of each table name is the database prefix you chose during installation. If you modified it during installation, the prefix you modified yourself will be displayed here.
wp_commentmeta: This table stores the meta information (Metadata) related to the comments published on the website. It has four fields meta_id, comment_id, meta_key, and meta_value, and each meta_id is associated with a comment_id. An example of storing comment meta information is the status of the comment (approved, pending, spam, etc.)
wp_comments: As you can see from the name of the data table, this table stores WordPress comments. It contains the reviewer’s name, URL, email address, comment content, etc.
wp_links: Used to manage blog volumes created by old versions of WordPress or link management plugins (which can be considered external links such as friendship links).
wp_options: This table contains most of the website settings, such as website URL, administrator mailbox, default category, number of articles per page, time format, etc. This table is also used by a large number of WordPress plugins to store plugin settings.
wp_postmeta: This table contains Metadata for WordPress posts, pages, and custom post types. For example, meta information can be which template to use to display the page, custom fields, etc. Some plugins also use this table to store plugin data, such as WordPress SEO information.
wp_posts: From the name it says posts, but actually this table contains all post types, or we can say content types. This table contains all your posts, pages, revisions, and custom post types.
wp_termmeta: This table allows developers to store custom metadata for entries in their custom categories. For example, WooCommerce will store product attributes and category metadata in this table.
wp_terms: WordPress has a powerful taxonomy system that you can use to organize your content. Each individual category term is called a term, and they are stored in this table. For example, WordPress directories and tags are categories, and each item in the directories and tags is a term.
wp_term_relationships: This table is used to manage the relationship between WordPress post types and terms in the wp_terms table. For example, this table can let WordPress know that the published article X belongs to the directory Y.
wp_term_taxonomy: This table defines taxonomy for terms in the wp_terms table. For example, if you have a term called “WordPress Tutorial”, the data in this table will associate this term with a category called Category. Simply put, the data in the table can help WordPress distinguish which term is a directory and which is a label.
wp_usermeta: Contains the meta information of registered users of the website.
wp_users: Contains user information, such as username, password, email, etc.
The WordPress database contains important settings, all blog posts, pages, comments, and more. Be very careful when using phpMyAdmin, otherwise, you may accidentally delete important data, and then it will be Game Over.
Just in case, be sure to fully back up your database before operating the database, so that even if something goes wrong, you can restore to the previous database.
Let me take a look at how to quickly back up the WordPress database.
To back up your WordPress database with phpMyAdmin, first, click on your database, and in the top menu, click (export) Export.

In newer versions of phpMyAdmin, you will be asked to choose an export method. Selecting the Quick method will export the database as a .sql format file. In custom mode, more options are available to download the backup as a zip or gzip compressed file.
We recommend using the custom method and choosing the zip format as the compression method. The custom method can also choose to remove some tables that do not need to be backed up from the database when backing up.
For example, you have used a plug-in that created a table, but you are no longer using this plug-in, so you can remove this table during backup.

Through the import (import) in phpMyAdmin, you can import the exported database file into another or the original database.
Keeping regular backups of your website is the most effective thing you can do when it comes to WordPress security. Although the WordPress database contains most of the website information, it still lacks some rather important elements such as template files, images, uploaded files, etc.
All images are stored in the uploads folder under the /wp-content/ directory. Even if the information in the database stores which picture is in which article, it is useless if there are no such files in the picture folder.
WP newbies often think that all they need to do is back up their database. That’s not true. You need to make a full backup of your website, including your themes, plugins, and images.
Although most hosting companies claim to provide daily backup services, we recommend that you do your own website backup just in case. You can use a WordPress backup plugin to set up regular automatic backups.
You can also easily import your WordPress database using phpMyAdmin. Start phpMyAdmin and select your database.
Next, click “Import” in the top menu.

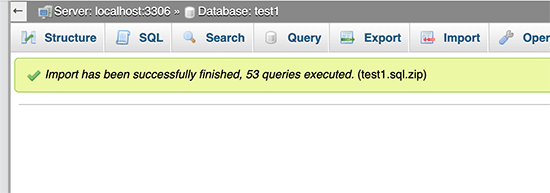
Click the “Choose file” button on the interface and select the database backup file you downloaded earlier. phpMyAdmin will then upload the backup file and import it into the WordPress database. After the import is complete, you will see a successful message prompt.
After WordPress has been running for a period of time, the database will generate some fragmented information. This increases the overall database size and query execution time.
MySQL itself has a simple command to optimize the database. Open phpMyAdmin, click to select your WordPress database and list all the data tables in the database.
Click “Select All” below the table, there is a drop-down list next to “With selected”, click the drop-down list, and select “Optimize table”.

This optimizes the WordPress database by defragmenting the selected tables, allowing your WordPress queries to run slightly faster while also reducing the database size slightly.
This method allows you to quickly reset your WordPress password if you have forgotten your admin password and cannot recover it via the reset password email.
First, start phpMyAdmin and select your database. In the list of data tables shown on the right, click the “Browse” link behind the wp_users table.

Note: The table names in your database may have different prefixes than those shown above.
Now you can see the rows of data in the user’s table. Click the “Edit” link to the far left of the username whose password you want to change.
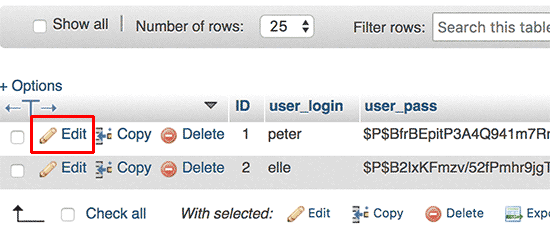
phpMyAdmin will display a form with all user information fields.
You need to delete the value in the user_pass field and fill in your new password. In the Function column, select MD5 from the drop-down box and click Go.

Your new password will be encrypted using MD5 and stored in the database.
Congratulations! You have successfully changed your WordPress password using phpMyAdmin.
Some people may wonder why we choose MD5 to encrypt passwords. In older versions, WordPress used MD5 to encrypt passwords. Stronger encryption has been used since WordPress 2.5. But WordPress still recognizes MD5 encryption.
When you log in with an MD5-encrypted password, WordPress will recognize it and re-encrypt it with a newer encryption algorithm.
Let’s assume a scenario where you have access to the WordPress database, but not the WordPress admin. You can change the password of the admin user, which prevents other admins from logging into their accounts.
An easier method is to add a new administrator account via phpMyAdmin.
First, start phpMyAdmin, then select your WordPress database and click the “Browse” link in the wp_users data table.

phpMyAdmin will display the data rows in the data table, and then click “Insert” in the top menu bar.
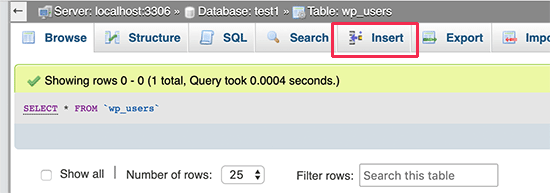
In the page that opens there is a form to add a new user.
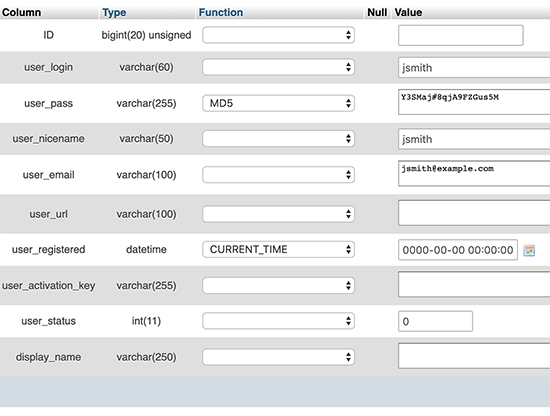
Here’s how to fill out each field in the form.
ID – Ignore this field as it is automatically generated by the program.
user_login – username to log into WordPress.
user_pass – This is the login password, you need to enter the password and select MD5 in the function column.
user_nicename – URL-friendly name, can be the same as the login username.
user_email – User email, which can be used to receive password reset emails or other notification emails.
user_url – The user’s website URL, or leave it blank.
user_registered – Please select “CURRENT_TIME” in the function column to automatically insert the current time.
user_activation_key – this line can be left blank, this is used to verify user registration.
user_status – This industry can be left blank.
display_name – you can enter the user’s full name if you want to display it in the article signature, of course, you can leave it blank.
After filling out the form, click the “Go” button to insert the new user into the database. PHPMyAdmin will run MySQL query commands to insert data.
We have now added a user, but this user’s role is not the administrator. This information is stored in another table called wp_usermeta.
Before we can set this user as an administrator, we need to know the user’s ID. Click “Browse” in the wp_users table to open the data table, and you can see the data and user ID of the newly added user.
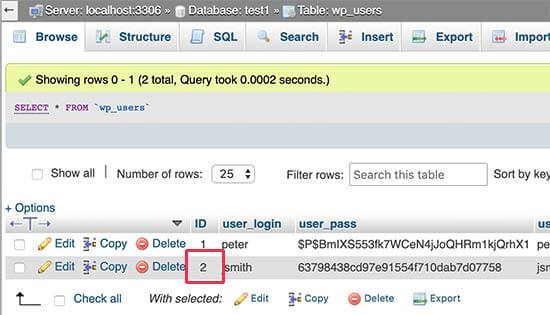
Remember the user ID, we will need it in the next step.
Now, open the wp_usermeta table.

Next, click Insert in the top menu to add a new row of data.

You’ll see a form for adding new data. Fill out this form to tell WordPress that a new user you just created has the role of administrator.
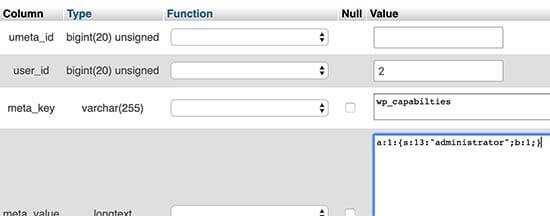
Here’s how to fill out this form.
umeta_id – leave blank, this is auto-generated.
user_id – Enter the user ID you just wrote down.
meta_key – Enter wp_capabilities. If your data table name uses other prefixes, you need to replace wp_ with your own.
meta_value – enter the following value:
a:1:{s:13:”administrator”;s:1:”1″;}
Finally, click the “Go” button to save your changes.
Next, we need to add another line to define the user level. Click “Insert” above to add another row of data in the user meta table.
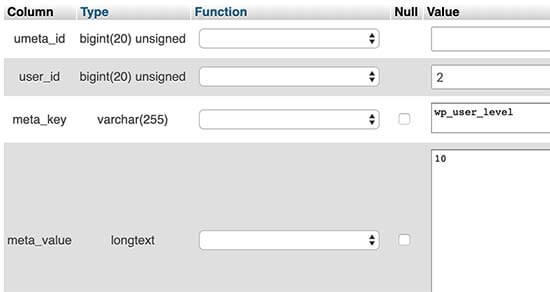
Here’s how to fill out the form.
umeta_id – distillate
user_id – Enter the ID of the newly added user.
meta_key – Enter wp_user_level. Replace the wp_ prefix with your own.
meta_value – Enter 10 as the value for the user level.
Then click “Go” to insert the data.
Now you can log in to the WordPress admin backend with the newly added admin user.
You may have also noticed that WordPress allows you to modify the user’s full name (Full Name) or nickname (Nickname), but does not allow you to modify the user name (Username).
Many people choose a username when they install WordPress, but may want to change it later. Here’s how to change your username through PHPMyAdmin.
Tip: It’s easier to change usernames with plugins.
First, start PHPMyAdmin, select your database, and browse the wp_users table.

This table shows all registered users on your site, click the “Edit” link next to the username you want to modify.
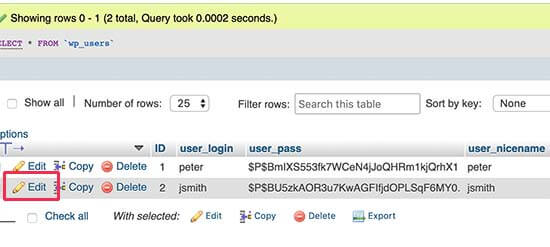
Find the user_login field and change the value to your desired new username.

Finally, click “Go” to save the changes and you will be able to log in to the site with your new username.
Before we get into the discussion, we want to stress that every site can be hacked. However, there are certain things you can do to make it a little harder.
The first thing you can do is modify the prefix of your WordPress database. This can significantly reduce the chances of a SQL injection attack on your database, as hackers usually attack websites in bulk and target the default wp_ table prefix.
Second, choose a username and password with a higher security level for your MySQL user, which will make it more difficult for hackers to crack your database.
For WordPress security, we highly recommend Sucuri. This is the best WordPress security plugin that intercepts any MySQL injection attempts before they even reach your website.
Finally, I hope this guide has taught you how to manage your WordPress database and how to use PHPMyAdmin.